If you run a blogging on WordPress, then you know how important it is to have a fast loading website. Low time delays can have a big impact on visitors-experience and also it take a big effect on page speed rank.
No, one like to wait, and will click away after just a few seconds. If you want to build a powerful and most successful site, then you must have to focus on improving the speed performance of your website. But definitely this is not an easy job. in there you have to do lot of things and customization to optimize your website speed. However, WordPress gives us an opportunity to install a cache plugins. In WordPress plugin library there are many free cache plugins available.
In this article, I will show you how to install and setup all new and powerful WP Rocket plugin to get maximum speed for your website. Before we get started, I suggest you to check your website current performance with – GTMetrix or Pingdom online tools.
WP-Rocket Plugin Overview
WP-Rocket is a all new premium caching plugin for WordPress website. This is the first premium cache plugin in the market, which is currently dominated by free plugins. It helps your website to boost the performance without effort and improve the user experience.
The plugin provides and offers your website to caching page, GZIP compression, CSS/JS minification, cache preloading, DNS Prefectching, Multisite compatibility, CDN support and much more. It also include LazyLoad option, which ensures that your uploaded images are only downloaded once the image is visible in browser for the users. You can also export all your plugin settings to other site using built in import/export tool.
Page Caching
Page Caching creates an ultra-fast load time, essential for improving on Search Engine Optimization (SEO) and increasing conversion rate. It gives your website at light speed.
Static Files Compression

WP Rocket easily reduces the weight of your HTML, JavaScript and CSS files through minification. Simply Lighter files means faster load time!
Lazy Load – Images on Request

It allow your uploaded images only visible on a page get loaded, then appearing as the user scrolls the page. The most well-known websites are using this technique (YouTube, Facebook, Yahoo!).
Download and Install the plugin
WP Rocket is a premium plugin, so you need to download and buy it from their website (WP-Rocket). Once you have downloaded the plugin, you can install directly from the WordPress dashboard same as other plugin. Just click the “Add new” button and then Upload plugin” button. Go ahead, and click the “Install Now” button to completely install WP Rocket in your website.
Download WP-Rocket
Basic Options
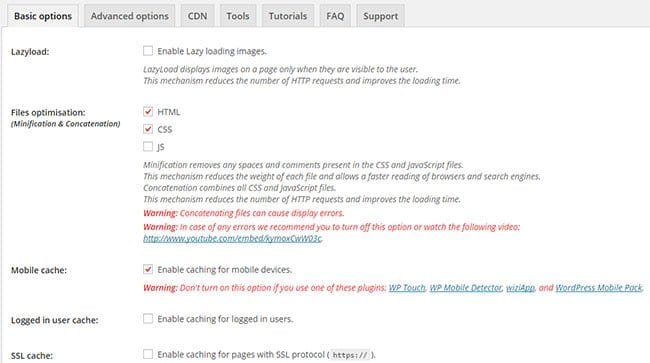
After the installing and activating plugin you will you’ll get a new navigation option under the settings menu: “WP Rocket”. Basic Options tab, by clicking on the “WP Rocket” menu under settings tab in admin panel. Where you can configure all the basic options such as Lazy Load, Minification, Mobile cache, SSL cache and more. For more about features read below:
Lazy Load – This feature ensure that your images are loaded only when they become visible for the users in browser. This feature is also available in a standalone plugin – Rocket Lazy Load. Before it you need to deactivate and delete all other caching plugins from plugins.
Minification – By minifying the CSS, HTML and Javascript files it makes a significant impact on your website. It reduces the file size of your static files by removing any spaces and comments it has.
Mobile Cache – Enabling Mobile Cache will ensure that your website will loads as fast as it loads on your desktop. Enable this features only, if your websites get a good amount of mobile traffic.
Logged in user cache – Basically, every cache plugins doesn’t work when a user is logged in. But by enabling this features you can enable caching for logged in users.
SSL cache – This features lets you to enable caching for each and every pages with SSL (https://) protocol.
Clear Cache Lifespan – Using this feature you can manually define the time in which cached files are automatically renewed or removed. By default it set to 24 hours.
Advanced options
I want to skip the advanced settings because the basic options are sufficient and it enough for speed up your website. You have no need to change anything in this option. You can skip this tab, if you haven’t enabled the Minification & doesn’t want to use DNS prefetching.
CDN
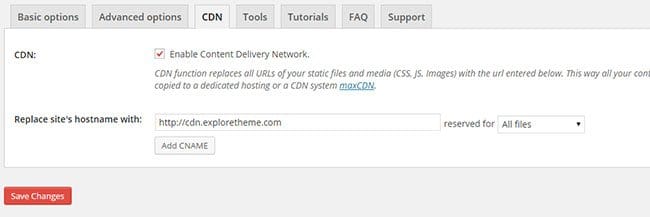
WP Rocket plugin supports all the popular CDN providers including MaxCDN, CludFlare etc. Here’s the complete list of top CDN services. You should check out yourself, which one suits best for you.
In this step you need to create a Pull Zone in your CDN dashboard account which you used. Login to your account, click on Zones menu, and then Create Pull Zone.
Once the propagation is completed, enable your Content Delivery Network, and add your CDN URL into your WP Rocket Cache settings (Dashboard » Settings » WP Rocket » Cache).
Tools
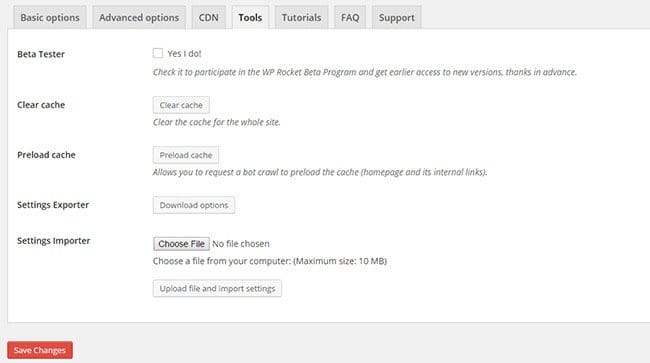
The tools tab that offers you a various options like participate in beta testing, clear cache, preload cache, settings exporter, and get earlier access of new versions.
WP Rocket also packed with a Frequently asked questions, video tutorials, and support page integrated into the plugin page.
Final Words
WP Rocket is a user friendly and easy to use caching solutions for WordPress website. The plugin priced at $39 only and comes with a 30-day money back guarantee with customer support.
If you have any questions, please comment below.